Receipt Processing Settings
Receipt processing settings allows Administrators to configure OCR and AI Settings to use within the system.
To access the receipt processing settings, log in as an administrator, and then click on the avatar menu, and then click the "System Settings" button, as shown below. Then click on the "Receipt Processing Settings" tab.
![]()
Viewing Receipt Processing Settings
Once the user has navigated to the receipt processing settings tab, they will be presented with a table containing the existing receipt processing settings.
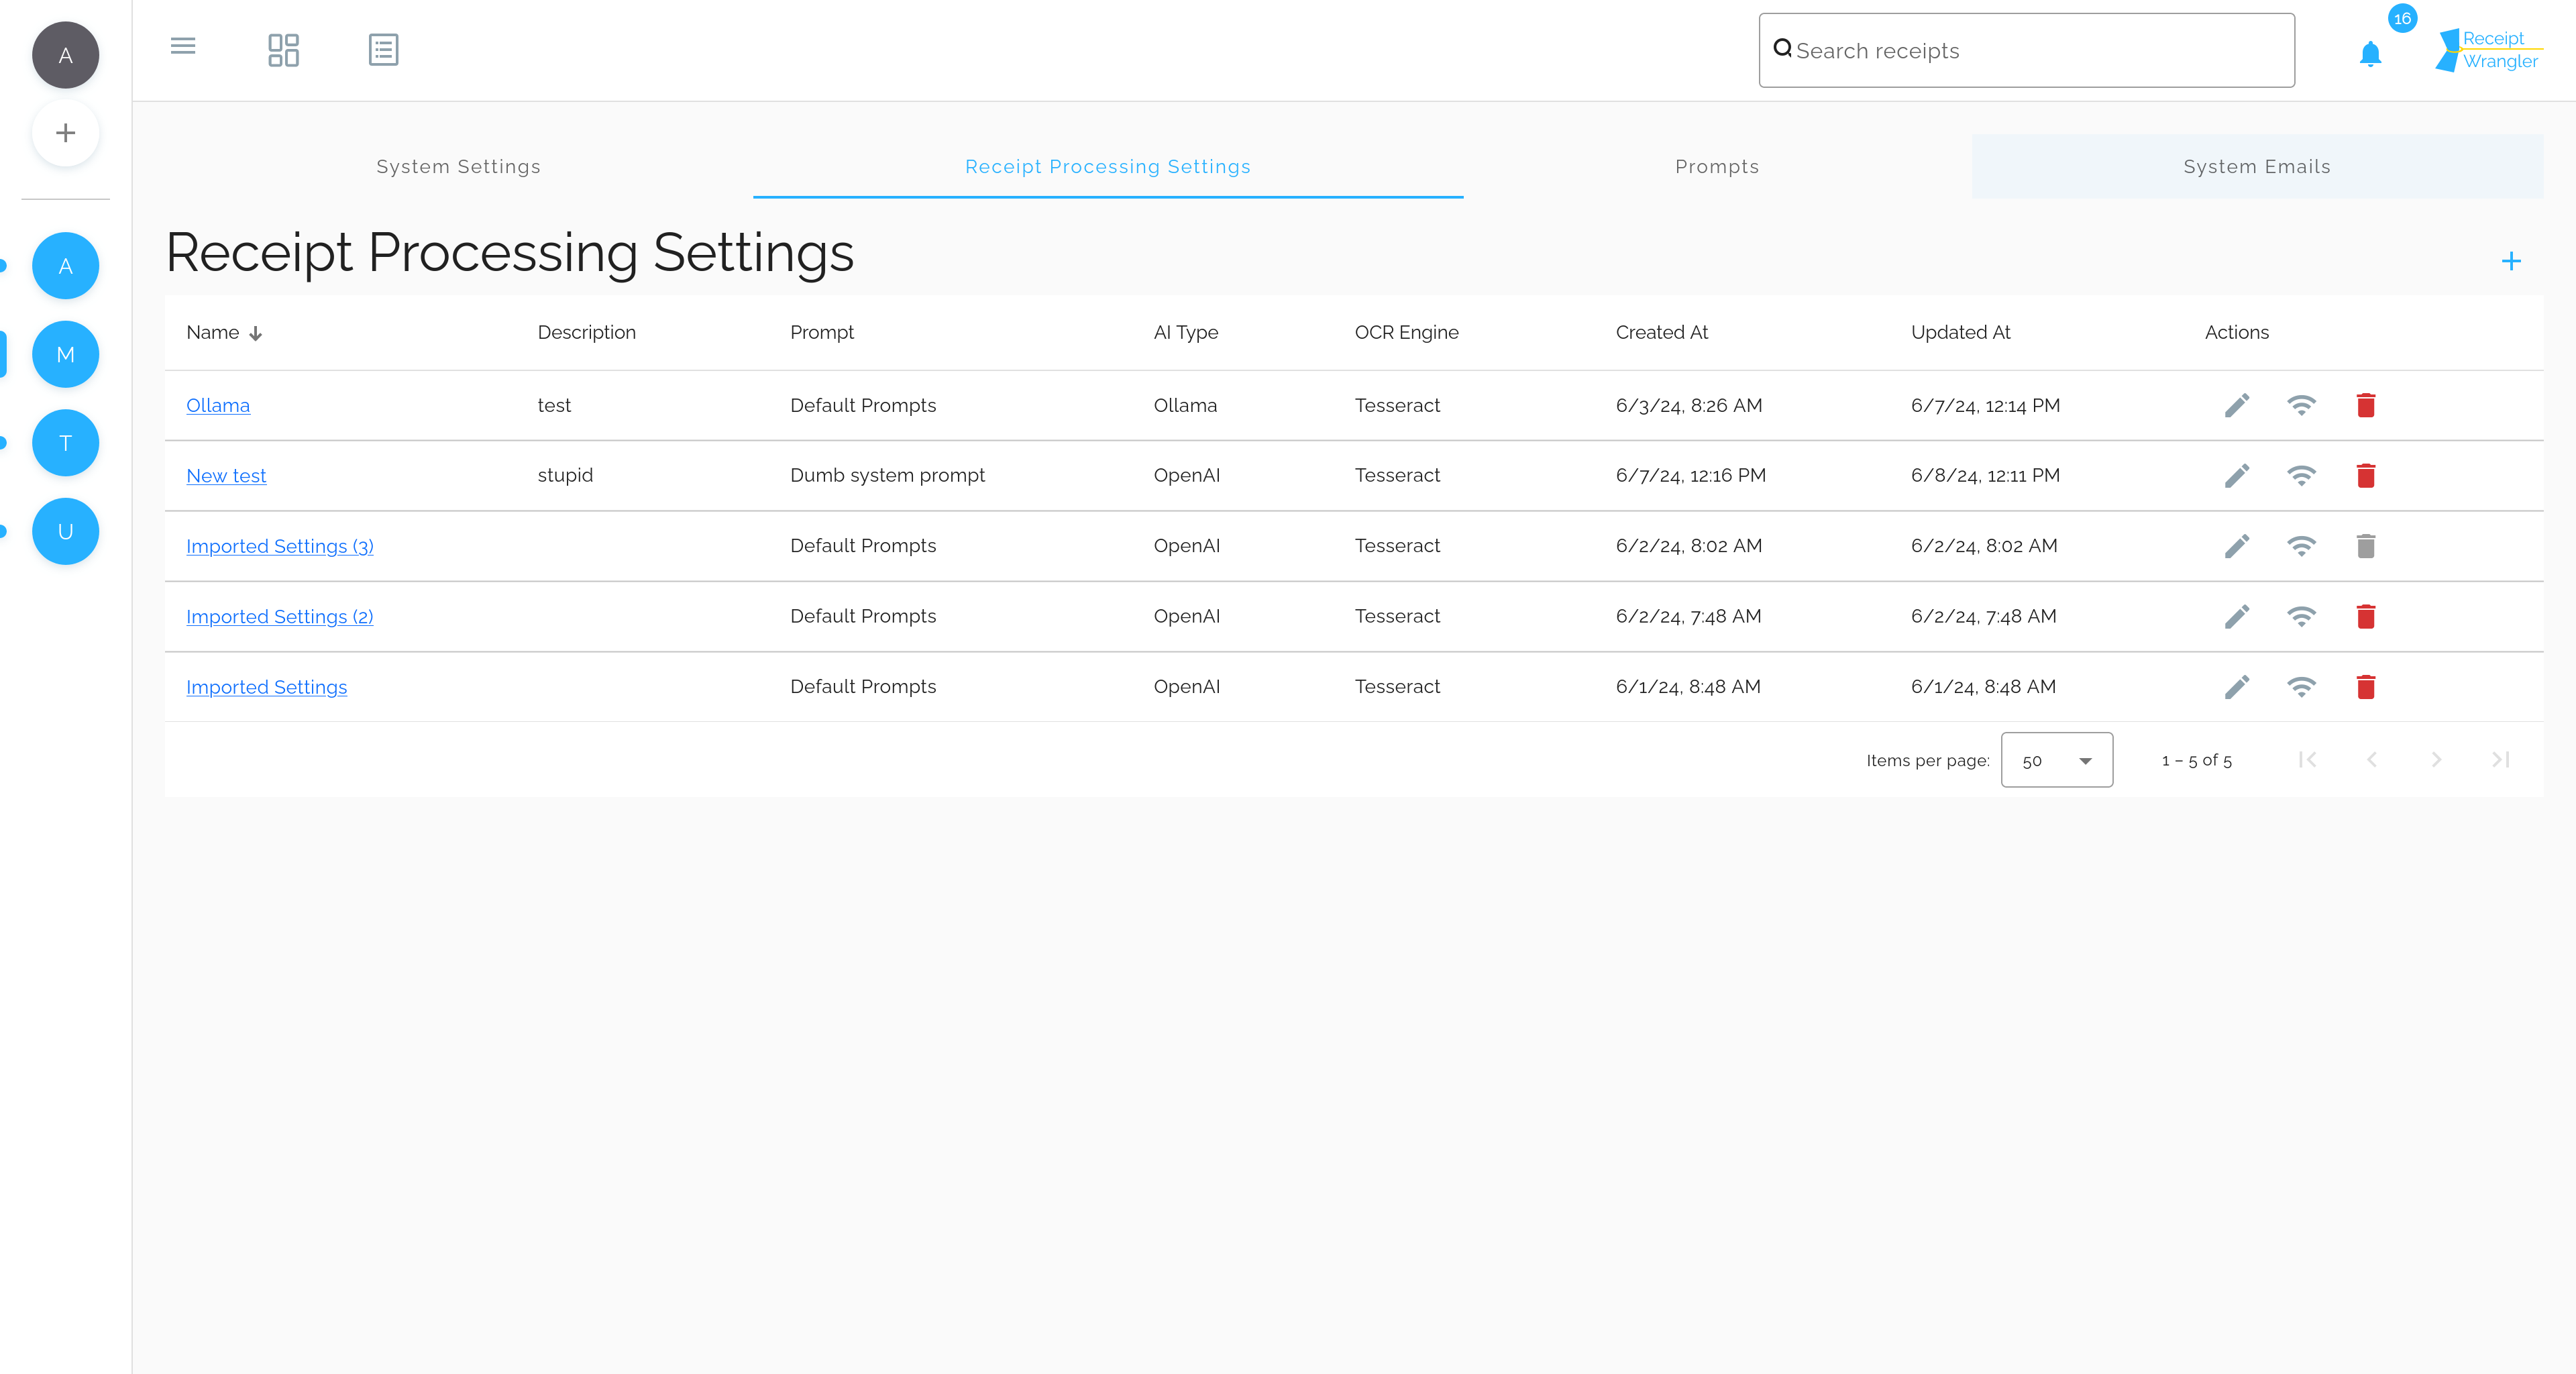
Each of the columns can be sorted by clicking on the column header, either ascending or descending, except for the actions column.
Actions
The actions column contains the following buttons:
Edit
This allows the user to edit the receipt processing settings.
Delete
This allows the user to delete the receipt processing settings, as long as it is not set in the system settings. Otherwise, a snackbar will be displayed that informs the user what the receipt processing settings is currently related to.
Check Connectivity
This allows the user to check the connectivity of the receipt processing settings. The result is stored as a system task.
Managing Receipt Processing Settings
To manage the receipt processing settings, click on the name hyperlink of the receipt processing settings you wish to view, or click the edit button in the actions column.
The following form will be displayed:
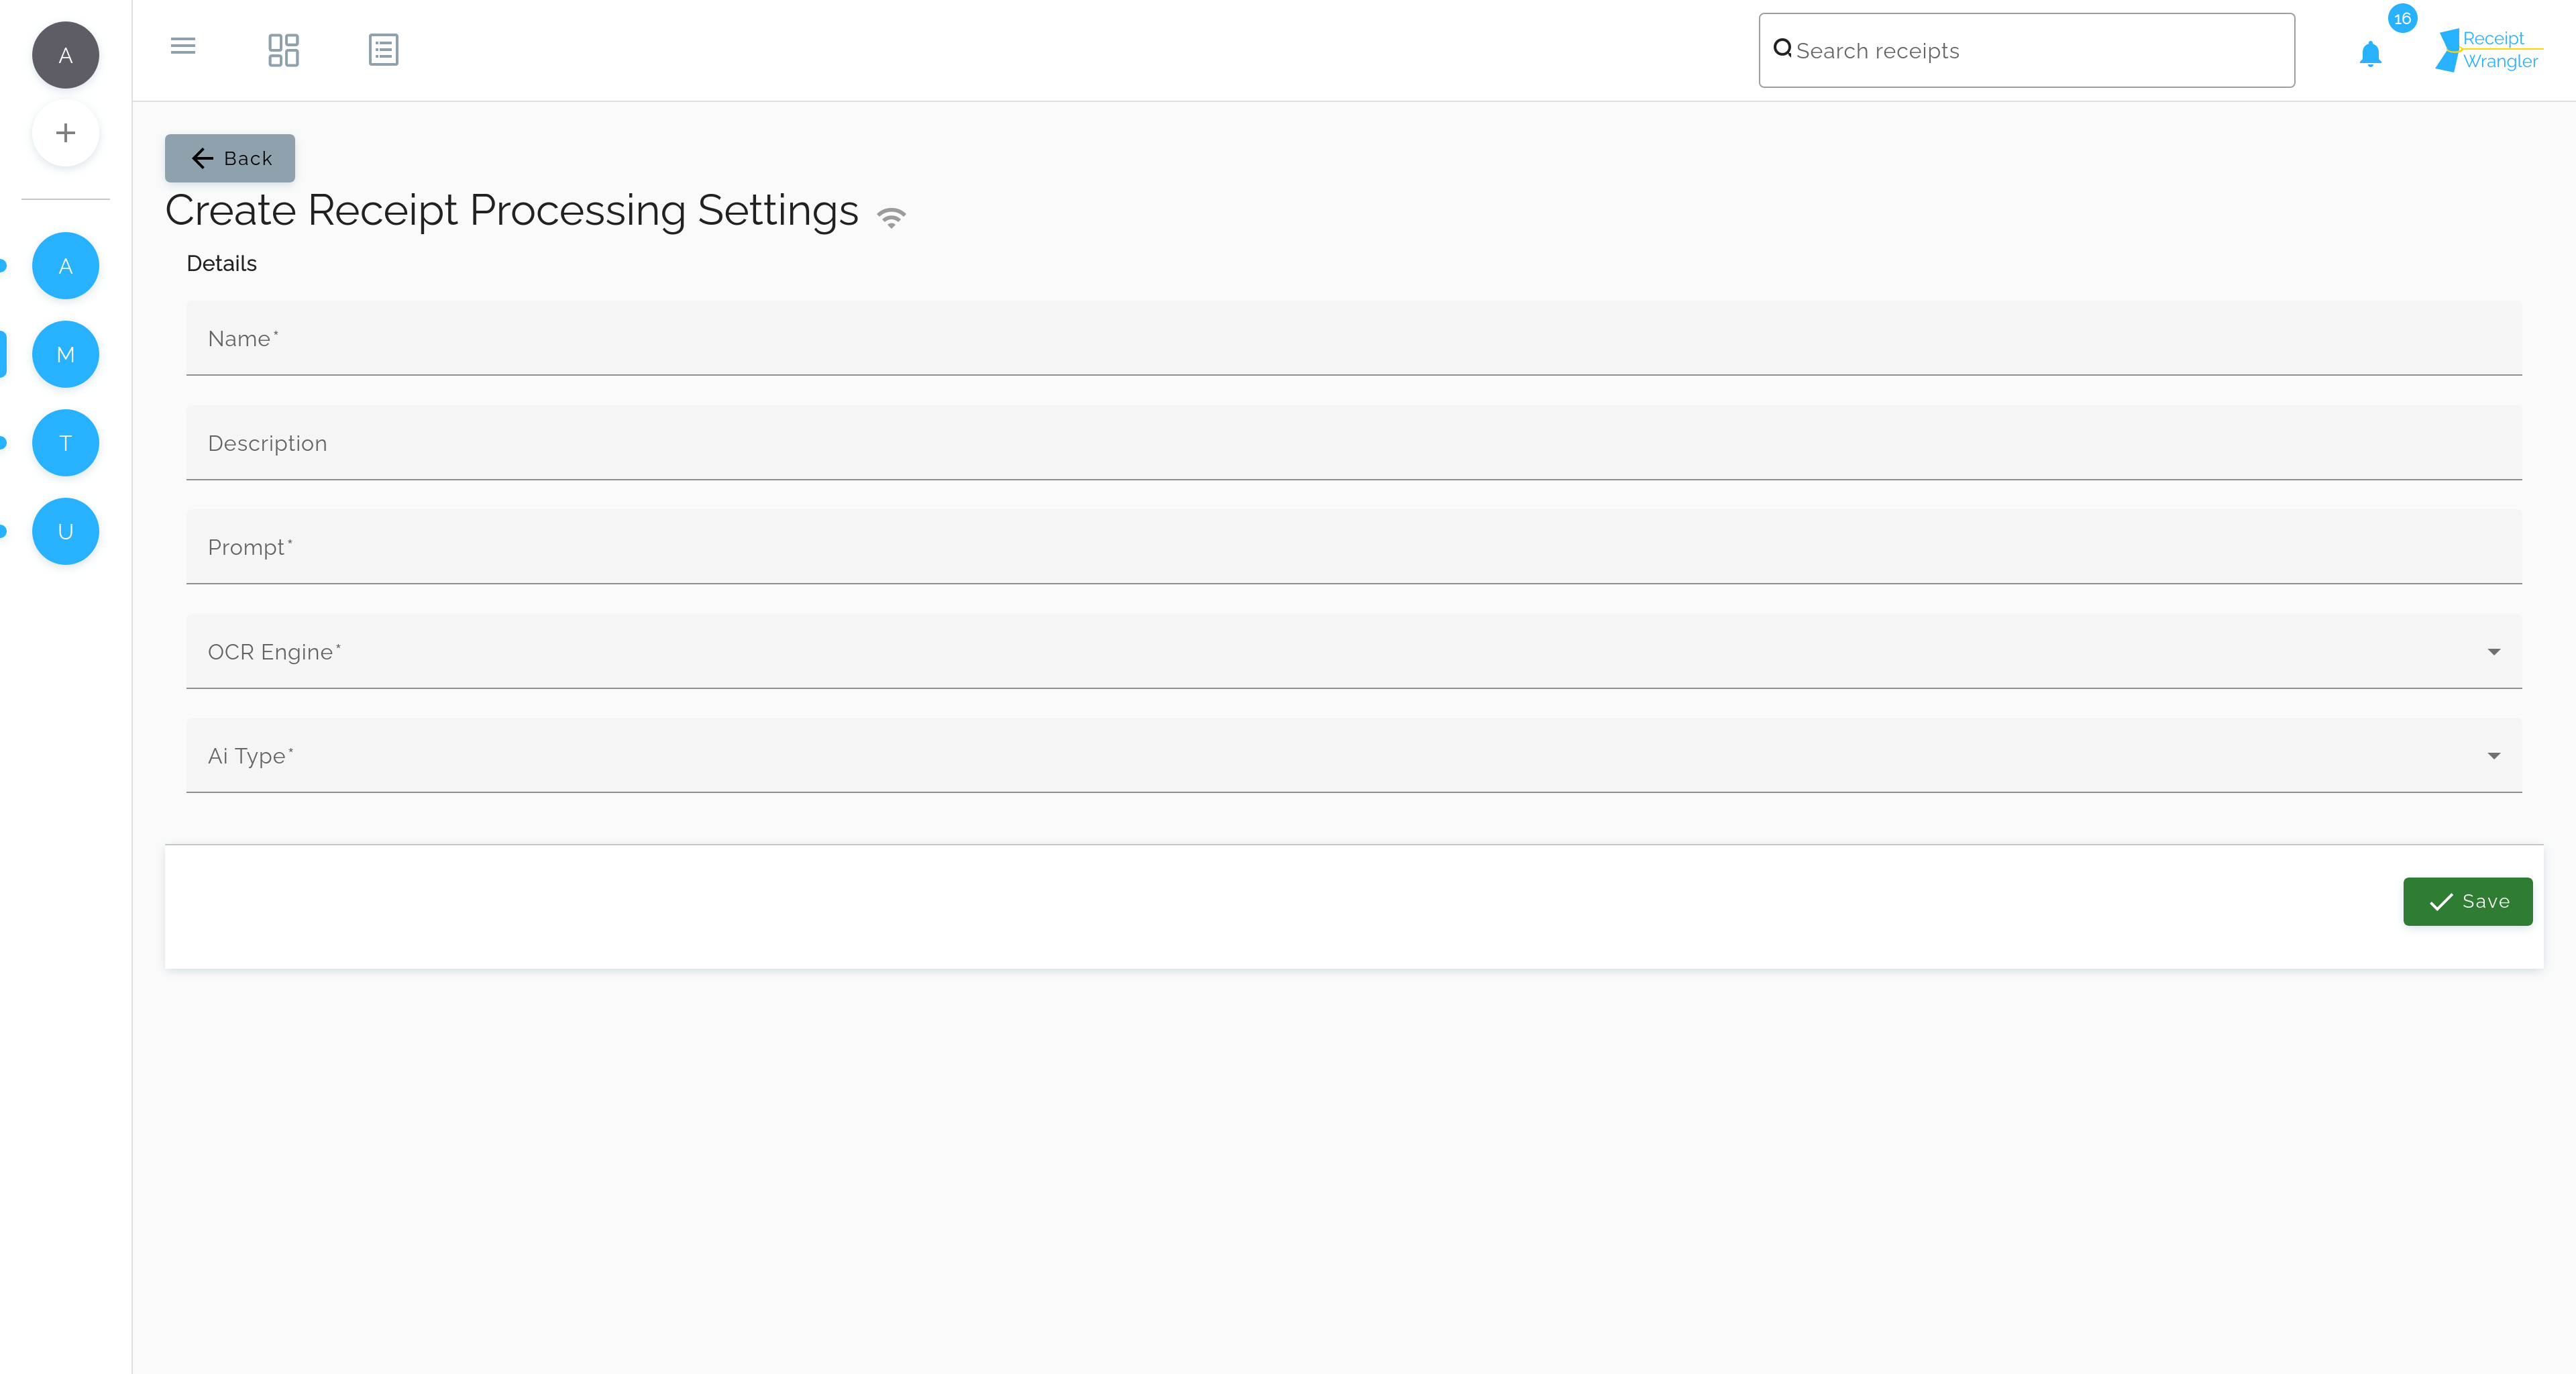
Header Buttons
-
Edit (not pictured): This allows the user to edit the receipt processing settings. This button is only visible when in view mode.
-
Connectivity Check: This allows the user to check the connectivity of the receipt processing settings. The result is stored as a system task, unless it is being created, then a system task will not be created.
Fields
Each AI Type may have slightly different settings, but the following fields are common to all AI Types:
Name
This is the name of the receipt processing settings.
Description
This is a description of the receipt processing settings.
Prompt
This is the prompt that will be used with the configured AI.
OCR Engine
This is the OCR Engine that will be used with the configured AI. Currently, Tesseract, and Easy OCR are the supported engines. Check out the OCR Engine documentation for more information.
AI Type
This is the type of AI that will be used with the configured OCR Engine. Currently, Open AI, Open AI Custom, Gemini, and Ollama are supported.
Enforce JSON Response Format
This determines whether the configured AI provider is asked to enforce a JSON-formatted response. It is enabled by default. Disable it if your provider does not support a JSON response mode, as not all providers support this option.
Managing Open AI/Gemini Receipt Processing Settings
When selecting Open AI or Gemini as the AI Type, the following fields will be displayed:
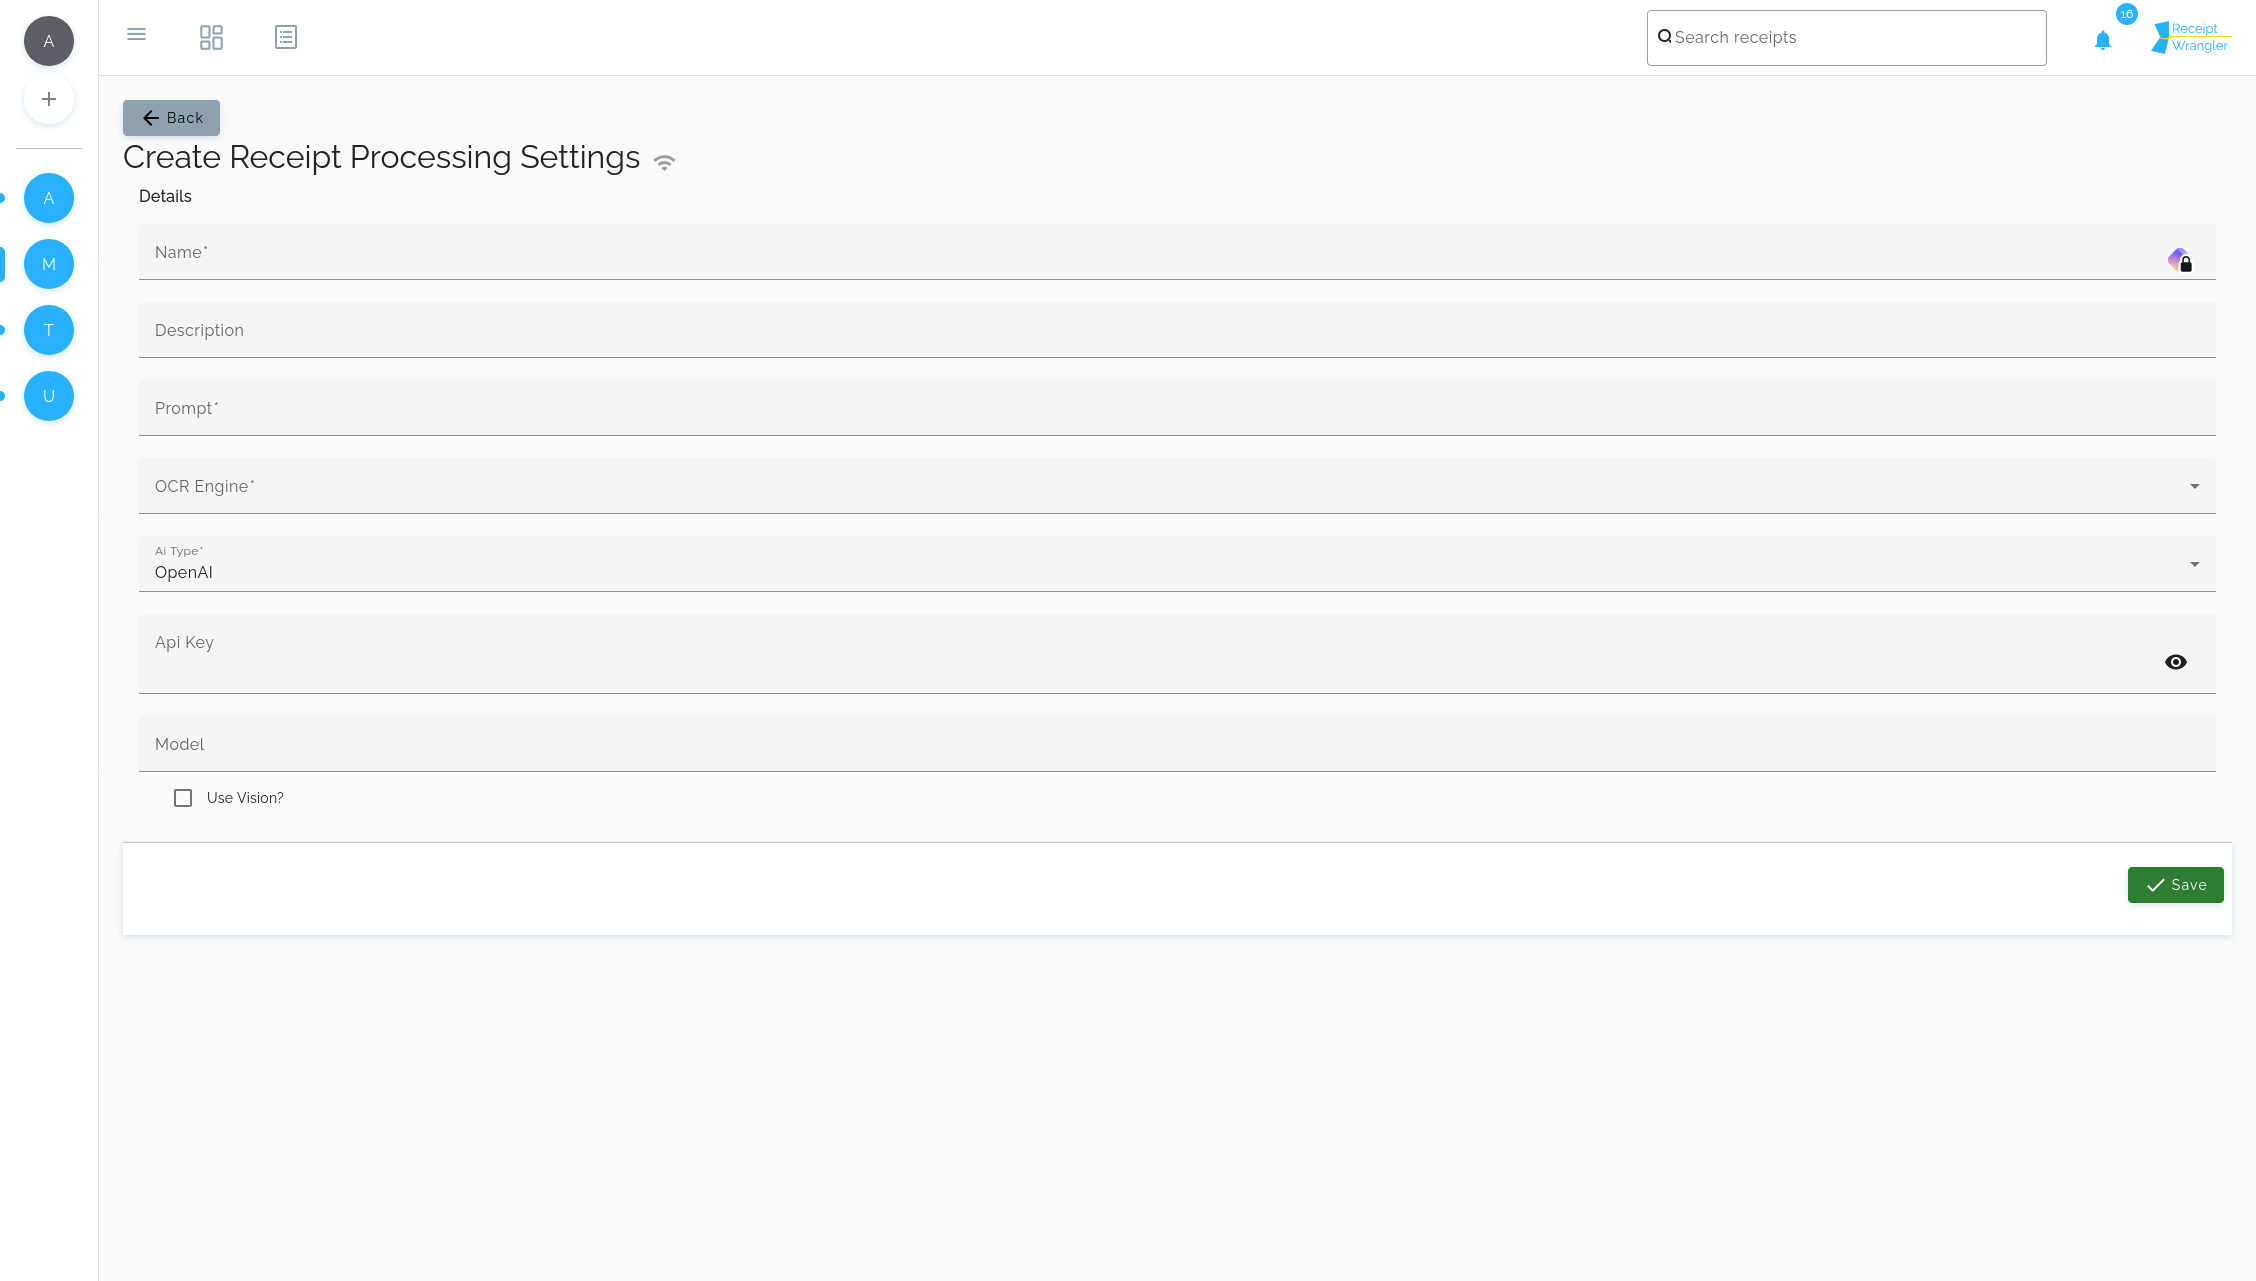
API Key
This is the API key that will be used with Open AI, or Gemini.
The key is stored encrypted in the database using AES 128 encryption, and it is never exposed in the UI, or transmitted to the frontend. Thus, when editing the API key, it will replace the existing key. A confirmation dialog will be displayed to confirm the change.
Model
Model that will be used with Open AI. Model names can be found here: https://platform.openai.com/docs/models.
Use Vision? (OpenAI Only)
This checkbox determines whether the AI will use vision. If checked, OCR will not be used and the image will be sent to the model in the format described here: https://platform.openai.com/docs/guides/vision.
Models that can perform vision are gpt-4o and gpt-4o-mini.
Managing Open AI Custom/Ollama Receipt Processing Settings
When selecting the Open AI Custom or Ollama as the AI Type, the following fields will be displayed:

URL
When the type is:
- Open AI Custom: This is the full URL to the completion endpoint, such as: http://192.168.0.1:1234/v1/chat/completions.
- Ollama: This is the FULL URL to the Ollama API, such as: http://192.168.0.118:11434/api/chat (Ollama v0.3.0 and above supported on the latest Receipt Wrangler version.)
Model (Ollama Only)
This is the model that will be used with Open AI Custom, or Ollama.
Use Vision? (Ollama Only)
This checkbox determines whether the AI will use vision. If checked, OCR will not be used and the image will be sent directly to the model in the message. The image is sent in the format described here https://github.com/ollama/ollama/blob/main/docs/api.md#chat-request-with-images.
System Tasks
After creating Receipt Processing Settings, system tasks will be created as these settings are being used. Currently, system tasks are generated when these settings are used to: Quick Scan, Magic Fill or use in Email Integrations.
Receipt Processing Settings Connectivity Check
This task is either a true or false. If succeeded, the API was able to connect to the AI server, and set a chat completion, and the AI has responded. If failed, the API was not able to connect to the AI server, or there was some problem with the chat completion. The resulting error is stored in the task.
Quick Scan/Magic Fill
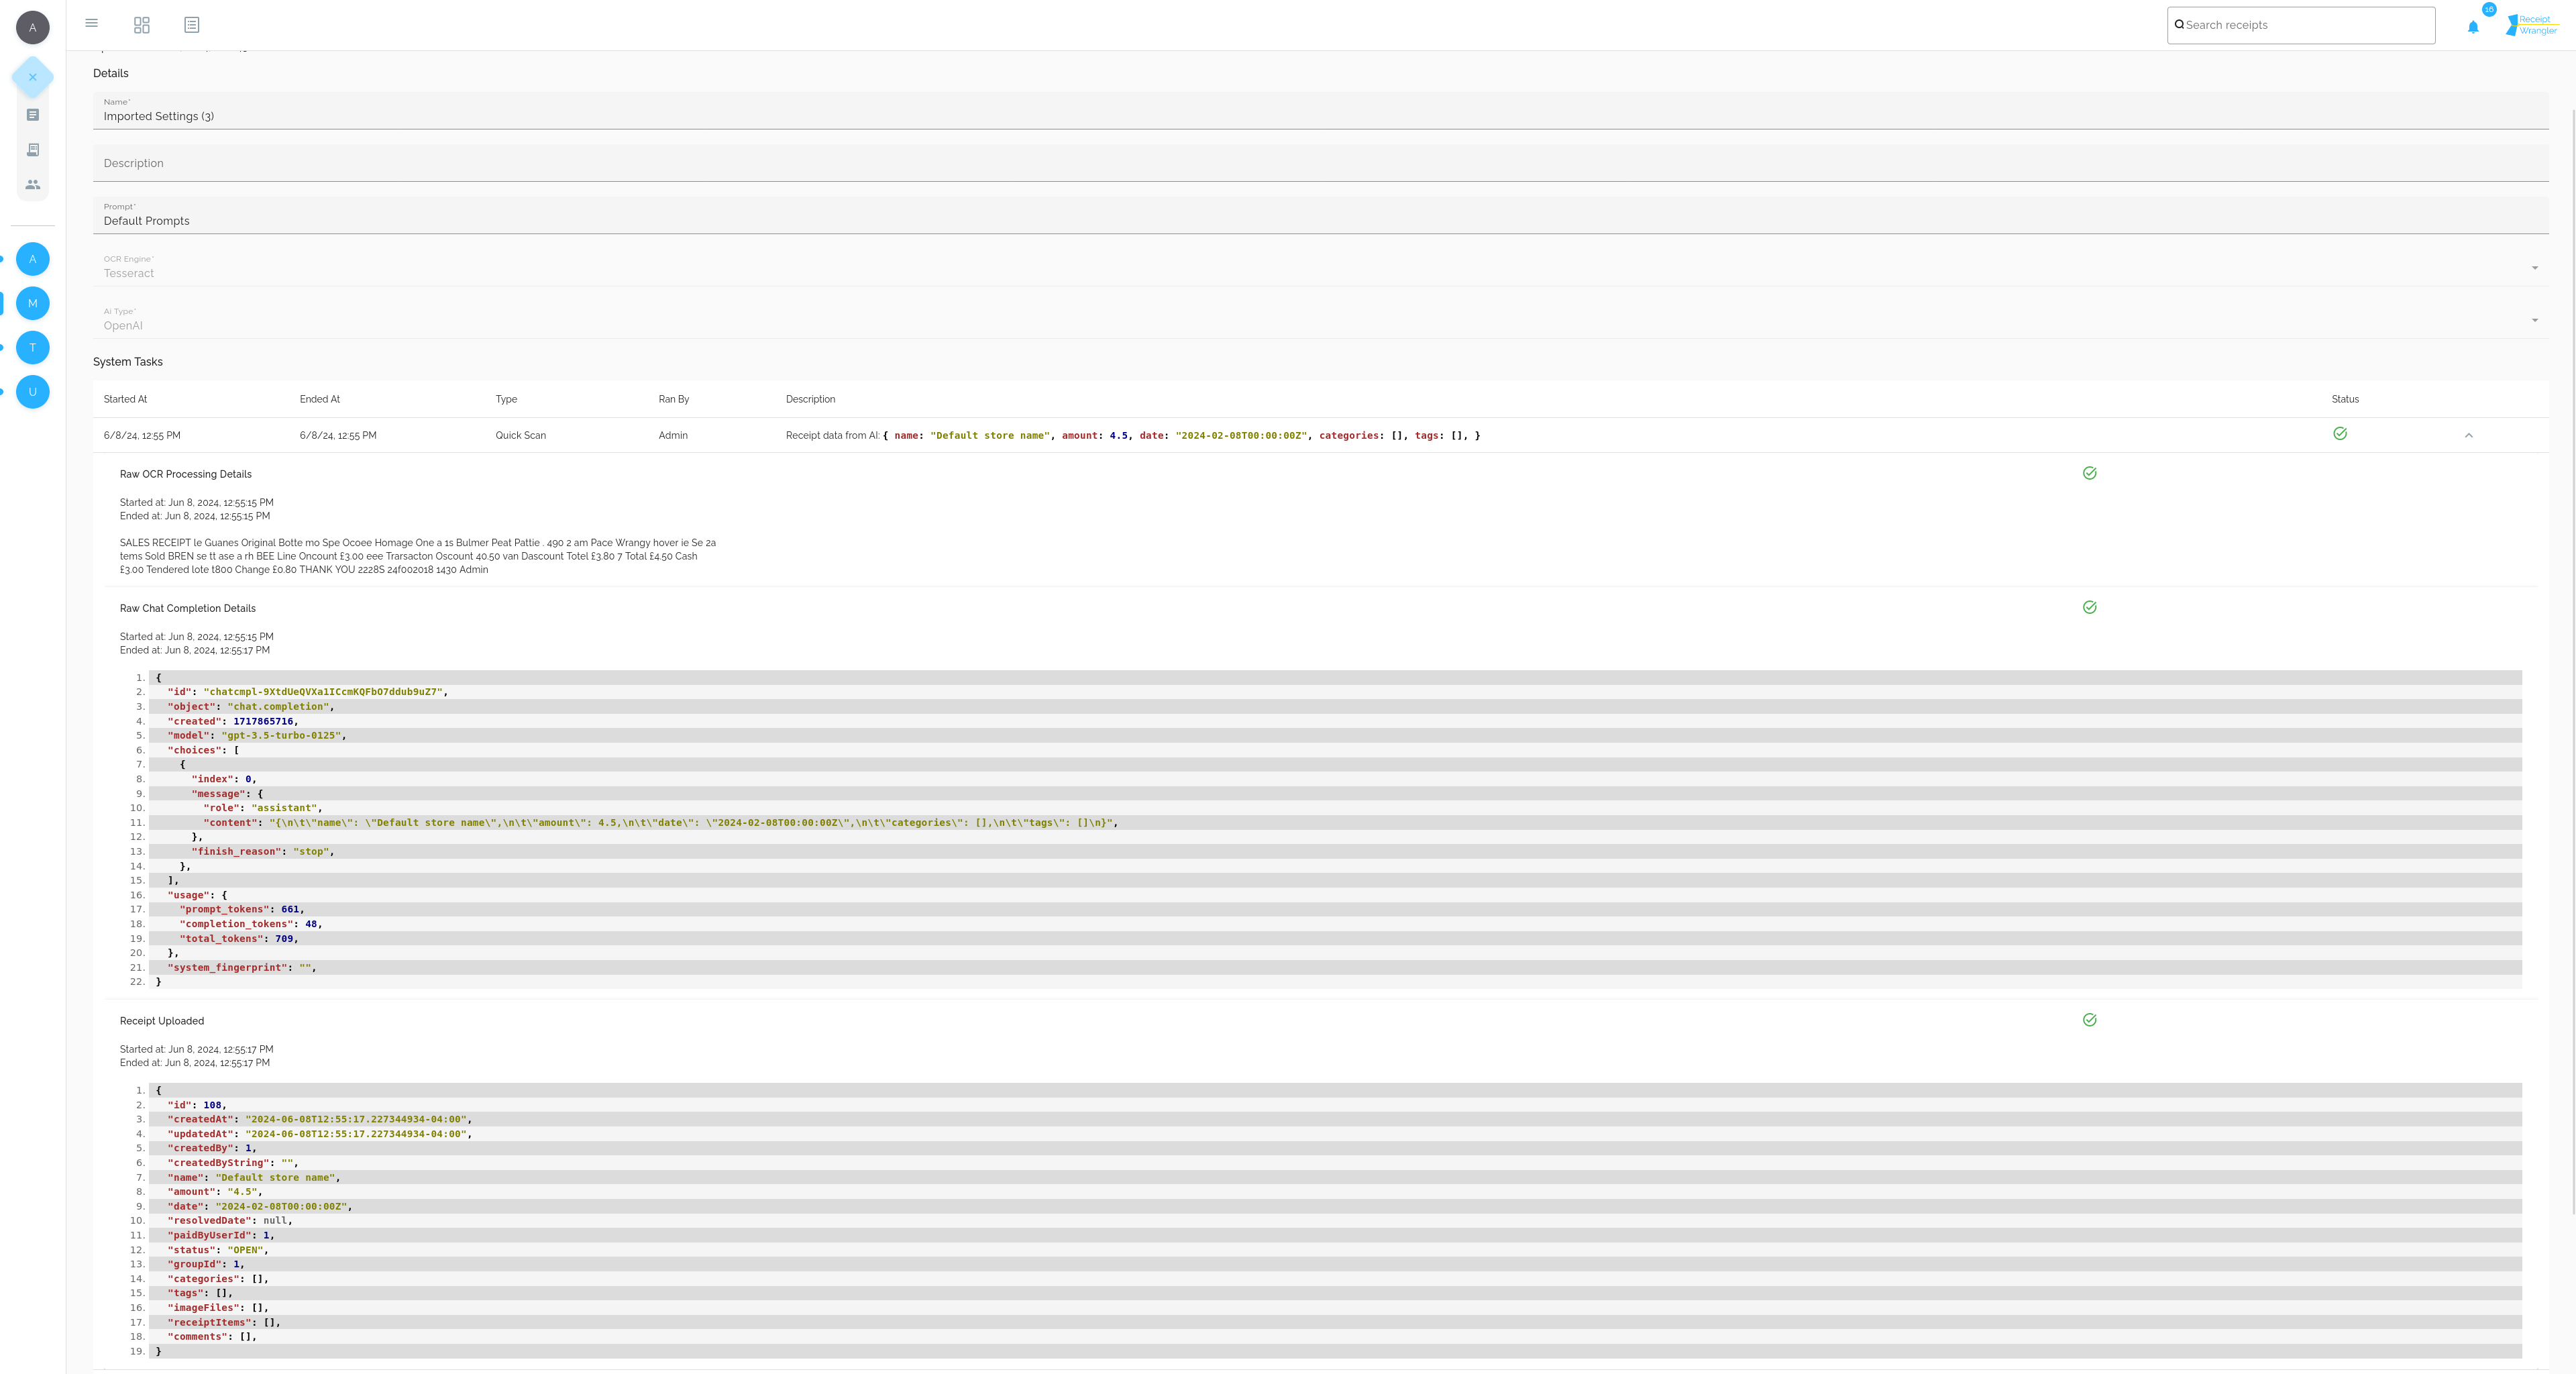
This is an example of a system task created from a Quick Scan. The magic fill system task is the same, except there is no Receipt Uploaded step.
What we are able to see, is each of the steps in the processing pipeline, the start time, end time, and the status each step.
In this example, I quick scanned a Receipt, and we can see the following steps:
- Raw OCR Processing Details: This is the raw OCR data that was extracted from the image, it has not been modified in any way.
- Raw Chat Completion Details: This is the raw response from whichever AI was used. In this example, open AI was used, and we can see the raw response here.
- Receipt Uploaded: This is the raw receipt that was uploaded to the system.
These system tasks make it extremely easy to debug issues with the AI, or somewhere else in the process. This is especially important, if administrators choose to use customized prompts, then this table will help figure out what's going on, and which parts may be failing.